듣기만해도 어려운 단어였다.
솔직히 한국말로도 생소한 단어이긴 함..ㅋ
사실 세가지가 다 연관되어 있는 개념인데, 알기 쉽게 설명을 해보자.
우리가 Spring Frame Work에서 쓰는 3계층 개념, 즉 Controller, Service, Repository를
보다 효과적으로 사용할 수 있도록 해주는 개념이라고 보면 된다.
만약 순차적으로... Controller를 사용 할 때, 그 클래스 안에서 Service 객체를 선언하고,
Service를 사용할 때, 그 클래스 안에서 Repository 객체를 선언하는 방식을 우선 생각해 보자.
public class Controller1 {
	private final Service1 service1;

	public Controller1() {
		this.service1 = new Service1();
	}
}
>> Controller에서 Service 객체를 선언했다.
public class Service1 {
	private final Repository1 repository1;

	public Service1() {
		this.repository1 = new Repository1();
	}
}
>> Service에서 Repository 객체를 선언했다.
public class Repository1 { ... }>> 그리고 Repository 객체를 선언했다.
그런데... 만약 Respository 객체가 다음과 같이 id, pw값을 받도록 Parameter 값들이 변경된다면?
public class Repository1 {

	public Repository1(String id, String pw) {
    // DB 연결
    Connection connection = DriverManager.getConnection("jdbc:h2:mem:springcoredb", id, pw);
  }
}
음.. 갑자기 멘붕이 오겠지.
Repository의 선언 방식이 바뀌니, Service에서 Repository 객체를 선언하는 방식이 바뀌어야 할 것이고
Controller에서도 Service 객체를 선언하는 방식이 순차적으로 모두 바뀌어야 할 것이다.
물론 컨트롤러가 1개라면 "음.. 그래 바꿔보자." 하겠지만 만약 아래 그림 처럼 해당 Repository를 사용하는 컨트롤러가
5개라면 그것은 상당히 큰 노동이 발생할 수 있다.(굉장히 비효율적이라는 것)
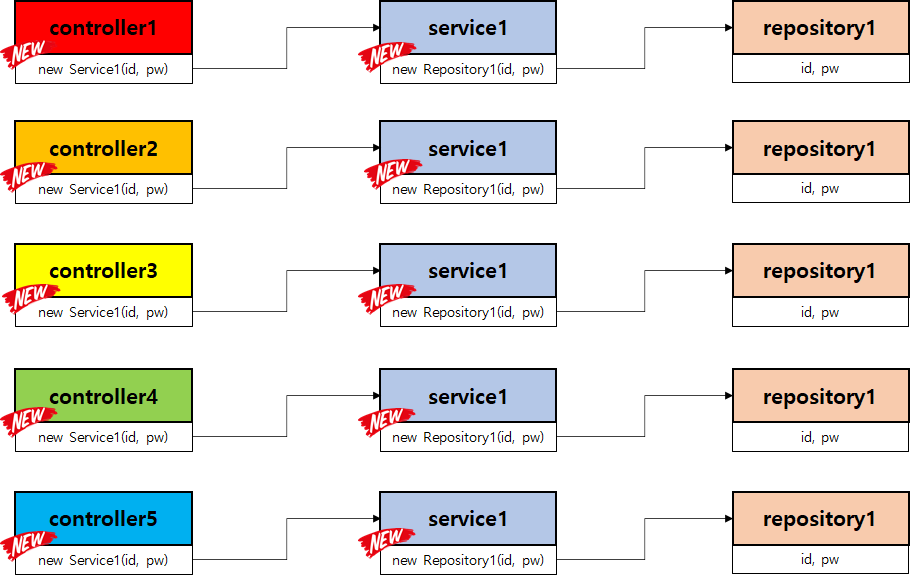
이러한 방식을 "강한 결합" 이라고 한다. 말 그대로 하나를 바꾸어주면 모든 것이 바뀌어야 하니
아주 강하게 결합되어 있다는 뜻이다.
이에 대한 해결방식으로는 "느슨한 결합"으로 이를 바꾸어주면 된다는 것이다.
이 개념이 드디어 DI(의존성 주입, Dependency Injection), IoC(제어의 역전, Inversion of Controll)이
등장하는 시점이다.
<느슨한 결합을 하는 방법>
1. 각 객체에 대한 생성은 딱 1번만 한다.
2. 생성된 객체를 모든 곳에서 재사용 한다.
자, 말로만 설명하면 어려우니 아래의 코드를 보며 정리해보자.
public class Repository1 { ... }

// 객체 생성
Repository1 repository1 = new Repository1();
>> Repository 클래스 선언 및 객체 생성
Class Service1 {
	private final Repository1 repitory1;

	// repository1 객체 사용
	public Service1(Repository1 repository1) {
		this.repository1 = new Repository1();
		this.repository1 = repository1;
	}
}

// 객체 생성
Service1 service1 = new Service1(repository1);
>> Service 클래스 선언 및 Service1 객체 생성(Repository1 사용)
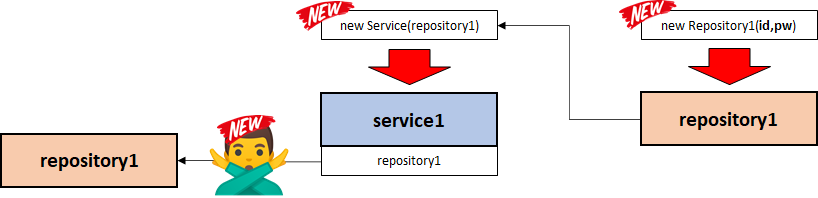
위의 두 가지 과정을 그림으로 표현하자면 이렇게 표현될 수 있을 것이다.
Class Controller1 {
	private final Service1 service1;

	// service1 객체 사용
	public Controller1(Service1 service1) {
		this.service1 = new Service1();
		this.service1 = service1;
	}
}
>> 그리고 Controller 클래스 선언 및 Controller1 객체 생성(Service1 사용)
자, 이 상황에서 아까의 강한 결합의 예시 처럼 만약 Repository 객체 생성 시 전달받는 Parameter값이
새로 추가 되었다고 가정해보자.
public class Repository1 {

	public Repository1(String id, String pw) {
    // DB 연결
    Connection connection = DriverManager.getConnection("jdbc:h2:mem:springcoredb", id, pw);
  }
}

// 객체 생성
String id = "sa";
String pw = "";
Repository1 repository1 = new Repository1(id, pw);
하지만 이제 Repository의 생성자 변경은 Service, Controller까지 바꾸어주어야 할 이유가 없어졌다.
자연스럽게 Service 객체, 그리고 Controller 객체도 변경 된 Repository 객체를 가져다가 쓸 것이기 때문이다.
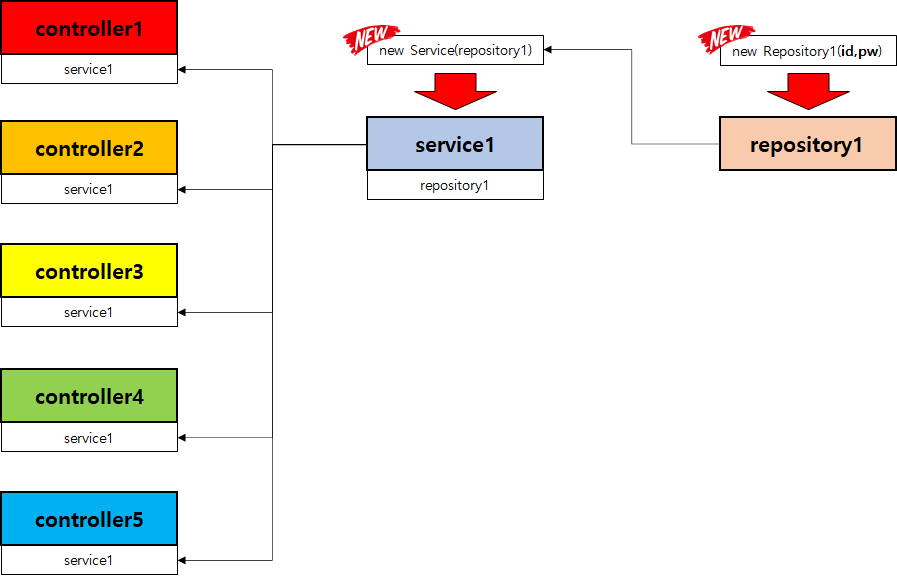
이렇게 용도에 맞게 이미 생성된 객체를 가져다가 사용하는 것을 DI(의존성 주입, Dependency Injection)이라고
표현할 수 있다.
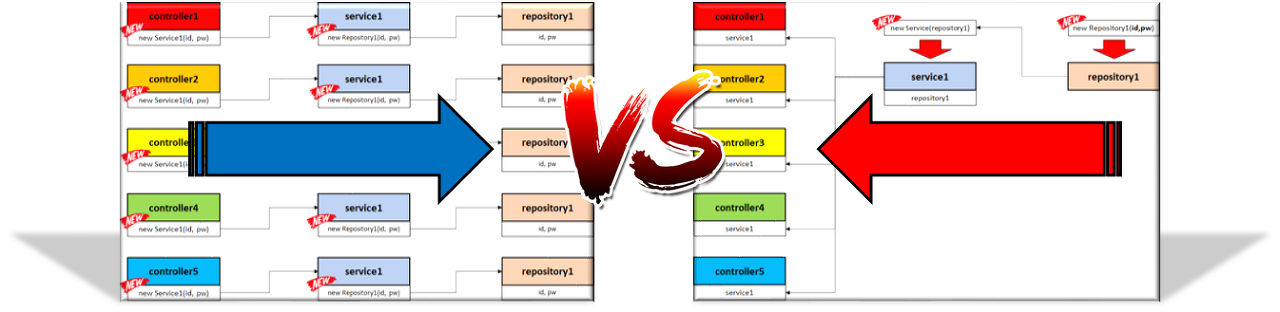
그리고 사용자가 필요할 때마다 객체를 생성해서 사용했던 방식에서 vs 용도에 맞게 필요한 객체를 가져다가 쓰는 방식으로 변한 것을 우리는 Ioc(제어의 역전, Inversion of Control)이라고 부를 수 있다.
자 여기서 드는 생각 하나. DI와 IoC개념을 적용하기 위해서는 Repository 객체 선언을 해주어야 했었다.
그렇다면 어디서 어떻게 객체를 선언해야할까?
>> 이럴 때 스프링 프레임워크가 필요한 객체를 생성 및 관리해주는 역할을 대신해주는데 바로 이 개념이
'Bean'의 개념이다.
다시 말하면, 스프링이 관리하는 객체를 우리는 Bean이라고 부르고,
스프링 Ioc 컨테이너를 우리는 Bean을 모아둔 저장소다 라고 이해하면 되겠다.
그렇다면 Bean을 어떻게 만들고 어떻게 사용해야할까?
@Component
public class ProductService { ... }
>> @Compenent라고 클래스명 위에 적어주면 Bean으로 등록이 된다.(의외로 간편한데?)

그러면 이렇게 public class 왼쪽에 콩 모양 C라고 적혀있는 아이콘이 뜨는데, 이 뜻은
"스프링 Ioc 컨테이너에서 관리 할 Bean 클래스다" 라는 표시이다.
단, 이러한 @Component 어노테이션을 아무 클래스에나 붙일 수 있는 것은 아니다.
@Configuration
@ComponentScan(basePackages = "com.sparta.springcore")
class BeanConfig { ... }
가능조건 >> @ComponentScan이라고 어노테이션이 달린 '패키지'와 '하위 패키지들'에 적용이 가능하다.
* 참고로 위 코드에서 @Configuration은 스프링이 기동 될때 처음으로 체크를 한다는 의미를 갖고 있는
어노테이션이라고 한다.(자세한 내용은 더 공부가 필요할듯)
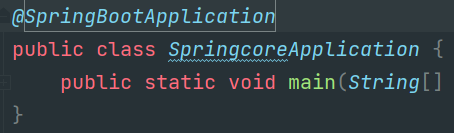

우리 프로젝트에서는 SpringcoreApplication 클래스에 달려있는 @SpringBootApplication 어노테이션이 있는데,
그 어노테이션을 ctrl + 마우스 클릭해보면 해당 어노테이션에 @ComponentScan 어노테이션이
달려있는 것을 확인 할 수 있다. 따라서 우리는 Springcore 패키지와 그 하부 패키지들에서 @Component 어노테이션을
사용할 수 있는 것이다.
스프링을 등록하고 사용하는데에는 크게 2가지의 방법이 있다.
첫번째 방법은 직접 Bean을 만들어서 사용하는 방법인데,
import org.springframework.context.annotation.Bean;
import org.springframework.context.annotation.Configuration;

@Configuration
public class BeanConfiguration {

    @Bean
    public ProductRepository productRepository() {
        String dbUrl = "jdbc:h2:mem:springcoredb";
        String dbId = "sa";
        String dbPassword = "";

        return new ProductRepository(dbUrl, dbId, dbPassword);
    }
}
BeanConfiguration 크래스를 만들고 @Configuration 어노테이션을 달아준 후,
@Bean 어노테이션 밑에 생성자를 넣어주고 객체 생성을 하는 방법이다.
이렇게 되면 서버가 처음 기동될 때, @Configuration이 달려있는 해당 Bean 클래스가 Spring IoC컨테이너에 등록이 되어 productRepository 객체를 사용할 수 있게 되는 것이다.(음.. 굳)
// 1. @Bean 설정된 함수 호출
ProductRepository productRepository = beanConfiguration.productRepository();

// 2. 스프링 IoC 컨테이너에 빈 (productRepository) 저장
// productRepository -> 스프링 IoC 컨테이너
두번째 방법은 @Autowired 어노테이션을 이용하는 방법이다.(자동으로 연결해준다는 뜻이겠지)
이는 위 방법보다 조금 더 간단한 방법인데, 결국 이것이 Spring의 장점이기도 한 듯하다.
@Component
public class ProductService {

    @Autowired
    private ProductRepository productRepository;

		// ...
}
>> 이처럼 멤버 변수 선언 위에 @Autowired 어노테이션을 적어주어도 되고,
@Component
public class ProductService {

    private final ProductRepository productRepository;

    @Autowired
    public ProductService(ProductRepository productRepository) {
        this.productRepository = productRepository;
    }

		// ...
}
>> 이처럼 함수 위에 @Autowired를 적어주어도 된다. 그러면 DI(의존성 주입)이 완료된다.
이러한 @Autowired 어노테이션도 쓸 수 있는 조건이 있는데,

>> Spring IoC 컨테이너에의해 관리 되는 클래스 내부에서만 쓸 수 있다.
우리 프로젝트에서는 ProductService 클래스에 @Service 어노테이션만 있고 @Component 어노테이션은 없어서
"어? 어떻게 @Autowired 어노테이션을 사용할 수가 있지?" 라는 의문이 들 수 있지만,
@Service
public class ProductService {

    private final ProductRepository productRepository;

    @Autowired
    public ProductService(ProductRepository productRepository) {
        this.productRepository = productRepository;
    }
@Service 어노테이션을 ctrl + 마우스 클릭해서 들어가보면,
@Target(ElementType.TYPE)
@Retention(RetentionPolicy.RUNTIME)
@Documented
@Component
public @interface Service {

	/**
	 * The value may indicate a suggestion for a logical component name,
	 * to be turned into a Spring bean in case of an autodetected component.
	 * @return the suggested component name, if any (or empty String otherwise)
	 */
	@AliasFor(annotation = Component.class)
	String value() default "";
이렇게 @Component 어노테이션이 Service에 이미 달려있음을 알 수 있다. (아 그래서 @Autowired를 쓸 수 있구나)
그리고 사실, @Component와 @Autowired를 기준으로 Bean을 만들고 사용하는 방법도 있지만,
Spring에서 lombok을 이용하면 아래 코드처럼, 간단한 lombok 어노테이션 선언만으로
@Autowired에 해당하는 생성자 함수를 생략하여 코드를 줄일 수 있다.
@RequiredArgsConstructor // final로 선언된 멤버 변수를 자동으로 생성합니다.
@RestController // JSON으로 데이터를 주고받음을 선언합니다.
public class ProductController {

    private final ProductService productService;

    // 생략 가능
		// @Autowired
		// public ProductController(ProductService productService) {
		//     this.productService = productService;
		// }
}
다만 그냥 간편하게 @RequiredArgsConstructor라는 Lombok 어노테이션을 사용하면 된다라는 사용법만 알던 때와는 다르게, DI, IoC, Bean 개념을 공부하고 사용하니 훨씬 더 이해가 잘 되었음은 자명한 사실이다.
이상으로 이번 주 WIL을 마친다.
요번주에는 TIL도 슬슬 써봐야겠다 ㅋㅋ
만나는 오류들이나 해결했던 문제들을 간단하게 좀 써봐야지..
글 쓰는 시간에 너무 많은 시간을 투자하는 것은 주객이 전도된다고 생각하긴 하지만
그래도 핵심적인 내용은 기록을 해두는 것이 중요하겠다.. 그래야 나중이 편할듯..
'TIL & WIL' 카테고리의 다른 글
| WIL_220606_ORM, JPA, SQL 그리고 꿈 (0) | 2022.06.06 |
|---|---|
| CS 스터디_1일 1로그 100일 완성_26챕터 (0) | 2022.06.02 |
| CS 스터디_1일 1로그 100일 완성_12, 13챕터 (0) | 2022.05.24 |
| WIL_220523_객체지향프로그래밍, JVM, Gradle, Maven 그리고 이모저모 (0) | 2022.05.23 |
| WIL_220517_JWT, Ajax, Flask 통한 API구현, 미니프로젝트 회고 (0) | 2022.05.17 |

